How to Configure a Miner to Connect to a Mining Pool on Windows
Why this guide matters: Whether you’re mining Bitcoin, Kaspa, Litecoin, or Dogecoin, connecting to the right mining pool is the most critical step. This tutorial covers everything from choosing the best mining pool for beginners to advanced solo mining configurations. We’ll walk through GPU setup on Windows, ASIC configuration (Antminer, Whatsminer), stratum addresses, and how to verify your miner is fully operational.
1. Preparing the Essentials: Wallet, Pool Address, and Mining Software
Before you even open a terminal or a browser to configure your mining rig, there are three non-negotiable components you must have ready. Skipping this preparation is the number one reason why new miners spend hours troubleshooting connection issues. Let’s break down each element in detail so you understand not just what you need, but why each piece matters for your profitability.
Cryptocurrency Wallet – Your Digital Receiving Address
The mining pool needs to know where to send your earnings. That’s the role of your wallet address. Each blockchain uses a unique format: Bitcoin addresses start with “bc1” or “1”, Litecoin with “L”, Kaspa with “kaspa:”, Dogecoin with “D”. If you mistakenly use a Bitcoin address on a Litecoin mining pool, the pool software will reject the connection immediately. For miners in the USA, Europe, or South America, we recommend using a non-custodial wallet (like Exodus, Electrum for BTC, or the official Kaspa web wallet) or a trusted exchange wallet (Binance, Kraken) for convenience. However, if you’re using an exchange address, double-check that the exchange supports mining payouts for that specific coin—some exchanges block mining deposits. Also, when you plan to mine through pools like Binance Pool, you’ll need your Binance account’s mining username rather than a raw wallet address. Always store your wallet address in a plain text file to copy-paste accurately: one wrong character and your rewards vanish forever.
Stratum Address and Port – The Gateway to the Pool
Every mining pool provides one or multiple “stratum” endpoints. The standard format looks like this: stratum+tcp://pool-domain.com:port. The stratum protocol is what allows your miner to communicate with the pool server. For Bitcoin mining, popular pools like Antpool, EMCD, and Viabtc offer servers across the globe—USA (East/West), Europe (Frankfurt, Amsterdam), and Asia. Choosing the geographically closest server drastically reduces network latency, which in turn lowers your stale share ratio. For example, a miner in Texas should connect to a US-based stratum, while someone in Germany should pick EU servers. This nuance is especially critical for solo mining where every microsecond matters. Additionally, many pools provide SSL-encrypted ports (usually 443 or 8443) to bypass ISP throttling—a trick that many experienced miners use to maintain stable connections.
Miner Software – The Bridge Between Hardware and Pool
For GPU mining (NVIDIA/AMD), you’ll need a miner program like lolMiner, GMiner, or NBMiner. For ASIC devices like Antminer, you don’t install software on a PC; you configure everything via the built-in web interface. However, for Windows-based GPU rigs, the process is simple: download the miner from the official GitHub repository (or the developer’s site), extract it to a folder like C:\miner\, and then create a batch file (.bat) that contains your startup command. Avoid downloading miners from random forums—many contain malware that steals your hashpower. Stick to known projects: lolMiner for Kaspa and Ethereum Classic, GMiner for a wide range of algorithms, and TeamRedMiner for AMD cards. For CPU mining (if you’re experimenting with Monero or other CPU-friendly coins), XMRig is the industry standard.
Recommended Mining Pools for USA, Europe & South America
Based on latency, reliability, and community feedback, we recommend the following pools for optimal performance in Western markets:
- EMCD — Modern pool with low fees (0.5% for PPLNS), excellent support, and a user-friendly interface. Great for Bitcoin and Kaspa. (referral link)
- Antpool — One of the oldest and largest pools, owned by Bitmain. Stable payouts, support for BTC, LTC, KAS. Time-tested.
- ViaBTC — Versatile pool with support for many coins and solo mining options. Strong presence in North America and Europe.
- Binance Pool — Perfect for users already trading on Binance. Payouts go directly to your Binance account. Supports BTC, LTC, KAS, and more.
- Luxor Mining Pool — Highly regarded for transparency and innovative features. Excellent US East/West servers for North American miners.
- TrustPool — Reliable pool with competitive fees, popular among Bitcoin miners.
- Kryptex — Ideal for beginners or for mining smaller altcoins. The software automatically selects the most profitable coin and pool.
Note: While Foundry is a major pool, it requires complex registration and is primarily for institutional miners. For individual miners, the pools listed above offer a smoother experience.
2. Step-by-Step GPU Miner Configuration on Windows (Using Kaspa as a Reference)
GPU mining remains the most accessible entry point for hobbyists. In this section, we’ll configure a GPU miner for Kaspa—currently one of the most profitable coins for mid-range and high-end graphics cards. The same principles apply to any coin; only the algorithm and pool addresses change. We’ll use lolMiner due to its stability and active development, but the workflow for GMiner or NBMiner is nearly identical.
Creating and Editing the Batch File
After downloading and extracting lolMiner, navigate to the folder. Right-click inside the folder, select “New” → “Text Document”, and rename it to start_kaspa.bat. Ensure the file extension is .bat, not .txt. Now, right-click the .bat file and choose “Edit” (or open with Notepad). The essential command structure for lolMiner with Kaspa is:lolMiner.exe --algo KASPA --pool stratum+tcp://pool-address:port --user YOUR_WALLET.WORKER_NAME
Replace pool-address:port with the actual pool data. For instance, if you’re joining EMCD or Luxor for Kaspa, you’d write something like --pool stratum+tcp://kaspa.emcd.io:3333 or --pool stratum+tcp://kas.luxor.tech:3333. The --user field contains your Kaspa wallet address, optionally followed by a dot and a worker name (e.g., kaspa:qpm...youraddress.rig1). Worker names help you monitor individual rigs on the pool’s dashboard. Save the file (Ctrl+S) and double-click it to launch the miner.
Selecting the Right Pool for Your Region
For users in the USA, South America, and Europe, picking a pool with low-latency servers is paramount. Let’s examine popular options: Binance Pool offers robust infrastructure with US and EU endpoints; it’s an excellent choice for beginners because of its seamless integration with Binance exchange accounts. EMCD provides competitive fees and stable connections from North America. Antpool (owned by Bitmain) provides reliable stratum addresses for SHA256 and Scrypt algorithms. For those interested in merged mining (Litecoin + Dogecoin), pools like ViaBTC and Luxor allow you to mine both simultaneously without extra configuration. When reviewing a pool, always check its fee structure: most pools charge between 0.5% and 4%. For solo mining enthusiasts, pools like EMCD, Viabtc, and f2pool offer dedicated solo mining ports where you keep 100% of the block reward if you find a block.
Advanced Parameters for Stability
To maximize uptime, add these optional flags to your .bat file: --retries 5 --retry-delay 10 – this instructs the miner to attempt reconnection five times if the connection drops, with a 10-second delay between attempts. Another useful parameter is --watchdog, which automatically restarts the miner if it freezes. For NVIDIA cards, you can also set power limits using command-line tools like nvidia-smi, but that’s separate from the miner itself. After launching, the console window will show lines with “accepted” – these are your shares being verified by the pool. If you see “rejected” above 2%, consider switching to a different pool port or using a VPN to stabilize the route.
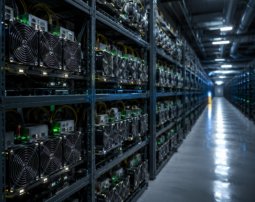
3. Configuring ASIC Miners (Antminer, Whatsminer) for Pool Connection
ASIC miners are purpose-built machines that dominate the Bitcoin, Litecoin, and Kaspa networks. Unlike GPUs, they don’t rely on a Windows PC for operation; instead, they have a built-in controller board with a web interface. Whether you own an Antminer S19, L7, or a newer model, the configuration workflow remains similar. We’ll use Antminer as the primary example because Antpool is one of the most popular pools among ASIC owners.
Finding Your ASIC’s IP Address and Accessing the Dashboard
Connect the ASIC to your router via Ethernet cable (Wi-Fi is not supported on most professional miners). Power it on. After about two minutes, the miner obtains an IP address. You can find it by logging into your router’s admin panel (usually at 192.168.1.1) and looking for connected devices labeled “Antminer” or “Bitmain”. Alternatively, use the manufacturer’s IP reporting tool (e.g., IP Reporter for Bitmain). Once you have the IP, type it into your browser’s address bar. You’ll be prompted for a username and password – default is “root” for both (or “admin” for some models). Immediately change the password to prevent unauthorized access, especially if your miner is in a shared data center or colocation facility.
Setting Up Pool Addresses and Wallet in the Miner Configuration
Inside the web interface, navigate to the “Miner Configuration” tab (sometimes called “Settings”). You’ll see three pool slots: Pool 1, Pool 2, and Pool 3. Always fill all three with the same pool’s different server addresses or with backup pools. This ensures that if the primary pool goes down, your miner automatically switches to the secondary, avoiding downtime. For Bitcoin mining in the US/EU markets, typical entries look like:
- Pool 1:
stratum+tcp://btc.emcd.io:3333(EMCD) orstratum+tcp://btc.luxor.tech:3333(Luxor) - Pool 2:
stratum+tcp://btc.viabtc.com:3333(ViaBTC) - Pool 3:
stratum+tcp://btc.antpool.com:3333(Antpool)
In the “User” field, input your wallet address. For pools that require a username (like Binance Pool), use your account name plus a worker ID. For example, on Binance Pool you’d enter YourBinanceUsername.WorkerName. On EMCD, Antpool, and Luxor, you simply enter your wallet address. After entering the details, click “Save & Apply”. The miner will reboot, and after about 30–60 seconds, you can check the “Miner Status” tab to see hashrate, temperature, and accepted shares.
Solo Mining vs. Pool Mining on ASICs
Some pools, such as EMCD, Viabtc, and Luxor, offer dedicated solo mining ports for ASICs. Solo mining means you compete alone to find a block; if you succeed, you keep the entire block reward (e.g., 3.125 BTC). However, the probability of finding a block with a single ASIC is extremely low unless you have massive hashrate. For most miners, joining a standard pool with PPLNS or FPPS payout schemes provides steady, predictable income. If you want to experiment with solo mining, ensure you understand the risk: you might mine for months without any reward. For those with multiple ASICs, some pools offer “solo proxy” modes where you direct all your devices to a single solo pool address.
4. Comprehensive List of Mining Pools and Stratum Addresses (US/EU/SA Focus)
Choosing the right mining pool directly impacts your daily earnings. Below is a curated list of the most reputable mining pools with servers optimized for North America, Europe, and South America. These pools offer competitive fees, transparent payout structures, and support for multiple algorithms.
- EMCD:
stratum+tcp://btc.emcd.io:3333(BTC),stratum+tcp://kaspa.emcd.io:3333(KAS). Low fees, excellent support. - Antpool:
stratum+tcp://btc.antpool.com:3333(BTC),stratum+tcp://ltc.antpool.com:3333(LTC). Reliable, massive hashrate. - Binance Pool:
stratum+tcp://bs.poolbinance.com:3333(BTC). Ideal for Binance users, seamless payouts. - ViaBTC:
stratum+tcp://btc.viabtc.com:3333(BTC),stratum+tcp://ltc.viabtc.com:3333(LTC/Doge merged mining). Great for solo mining. - Luxor Mining Pool:
stratum+tcp://btc.luxor.tech:3333(BTC),stratum+tcp://kas.luxor.tech:3333(KAS). Excellent for North American miners. - TrustPool:
stratum+tcp://stratum.trustpool.org:3333(BTC). Solid reputation, competitive fees. - Kryptex: Use their desktop app for automatic coin/pool selection. Great for beginners.
When evaluating a pool, always look at the “pool fee” and “payout method” (PPS, PPLNS, FPPS). PPS (Pay-Per-Share) gives instant rewards but usually has higher fees. PPLNS (Pay Per Last N Shares) encourages loyalty and often has lower fees. For solo mining enthusiasts, check if the pool provides a “solo mining” section with clear instructions—pools like EMCD, Viabtc, and Luxor have dedicated solo stratum addresses.
5. Verifying Your Miner is Connected and Running Smoothly
After configuring the miner (whether GPU or ASIC), the final step is verification. It’s not enough to see the miner running; you must confirm that the pool is accepting your work and that your rewards are being recorded. Let’s go through the essential monitoring steps that every serious miner should perform daily.
Reading the Miner Console / Logs
For GPU miners, the command prompt window is your primary interface. Look for green lines that say “accepted” followed by a share number. This means the pool has validated your work. If you see frequent “rejected” lines, check the latency by pinging the pool address. A high ping (above 150ms) often leads to stale shares. Some miners display “HW errors” – these indicate hardware instability; reduce overclocks if they appear. For ASICs, the “Miner Status” page shows “Accepted” and “Rejected” shares. A healthy ASIC will have a rejection rate below 1%.
Using the Pool’s Dashboard for Deeper Insights
Every major mining pool provides a public dashboard where you can enter your wallet address or worker name to view real-time stats. For example, on Luxor, go to their website, click “Dashboard”, and input your wallet. You’ll see your current hashrate, average hashrate over 24 hours, estimated earnings, and payout history. This is the most reliable way to confirm that your connection is stable and that the pool recognizes your devices. If the pool dashboard shows zero hashrate despite your miner running, there’s likely a configuration mismatch (wrong wallet format or stratum address).
Common Troubleshooting Scenarios
Scenario 1: Miner runs but pool shows 0 hashrate. Solution: Double-check that you entered the correct stratum address and port. Some pools require a specific URL for US/EU regions (e.g., us.luxor.tech vs. luxor.tech). Scenario 2: High reject rate (above 5%). Solution: Switch to a pool server closer to your geographical location. For South American miners, connecting to US East servers often yields better latency than EU servers. Use a tool like WinMTR to trace the route to the pool’s IP. Scenario 3: Miner starts but stops after a few minutes. This is often caused by firewall software or antivirus terminating the process. Add the miner folder to the exceptions list in Windows Defender or your third-party antivirus.
Ensuring Long-Term Profitability
Once your miner is stable, set up monitoring tools or use the pool’s mobile app to receive alerts if your hashrate drops. For large-scale operations, consider using mining pool software like Hive OS or Awesome Miner to manage multiple rigs. Also, keep an eye on network difficulty and mining pool fees—they change over time. The best mining pool for beginners might not be the most profitable after a difficulty adjustment. Stay informed by following mining communities and regularly checking mining pool lists on aggregator sites like MiningPoolStats, which provides up-to-date data on pool fees, hashrate distribution, and payout methods.
Final Recommendations for Miners in USA, South America & Europe
- Choose pools with local servers: EMCD (global), Antpool (US/EU), Luxor (US), Binance Pool (US/EU).
- Understand fee structures: Solo mining = 0% fee but high variance; PPLNS pools typically charge 1–2%.
- Secure your wallet: Use hardware wallets for large balances and never share your private keys.
- Stay updated: Follow official pool announcements—some pools (like EMCD, Luxor) occasionally offer promotional zero-fee periods.
Ready to start mining? Whether you’re setting up your first GPU rig or deploying a farm of ASICs, the principles remain the same: prepare your wallet, select the best mining pool for your region, configure the stratum address correctly, and monitor performance. The global mining ecosystem in 2026 offers more choices than ever—from large pools like Antpool and Binance Pool to solo-friendly platforms like EMCD and Viabtc. Use this guide as your roadmap, and always verify settings before letting your rig run unattended. Happy mining!