Bitcoin Mining on Raspberry Pi
Let’s get one thing straight right from the start: can you profitably mine Bitcoin on a Raspberry Pi? The short answer is a hard no.
A Pi’s processor is thousands of millions of times too slow for the modern Bitcoin network. While it’s a fascinating educational project, it’s definitely not a financial one. Think of it as a low-cost ticket to understanding how crypto networks actually operate behind the scenes. In short, this is all about the learning experience, not the earnings.
Setting Realistic Expectations for Pi Mining
If you’re diving into mining Bitcoin with a Raspberry Pi, it’s absolutely crucial to start with the right mindset. This isn’t a secret shortcut to earning crypto. Instead, view it as a hands-on lesson in network protocols, hardware limitations, and the mind-boggling scale of the global Bitcoin network.
The goal here is knowledge, not profit.
The fundamental challenge comes down to a massive gap in processing power. Modern Bitcoin mining is completely dominated by Application-Specific Integrated Circuit (ASIC) miners—machines designed to do one single thing: hash algorithms incredibly fast. A Raspberry Pi’s CPU, while a wonderfully versatile little chip, is a general-purpose processor that simply can’t even begin to compete.
This infographic really drives home the immense power difference between a Pi and a dedicated ASIC rig.
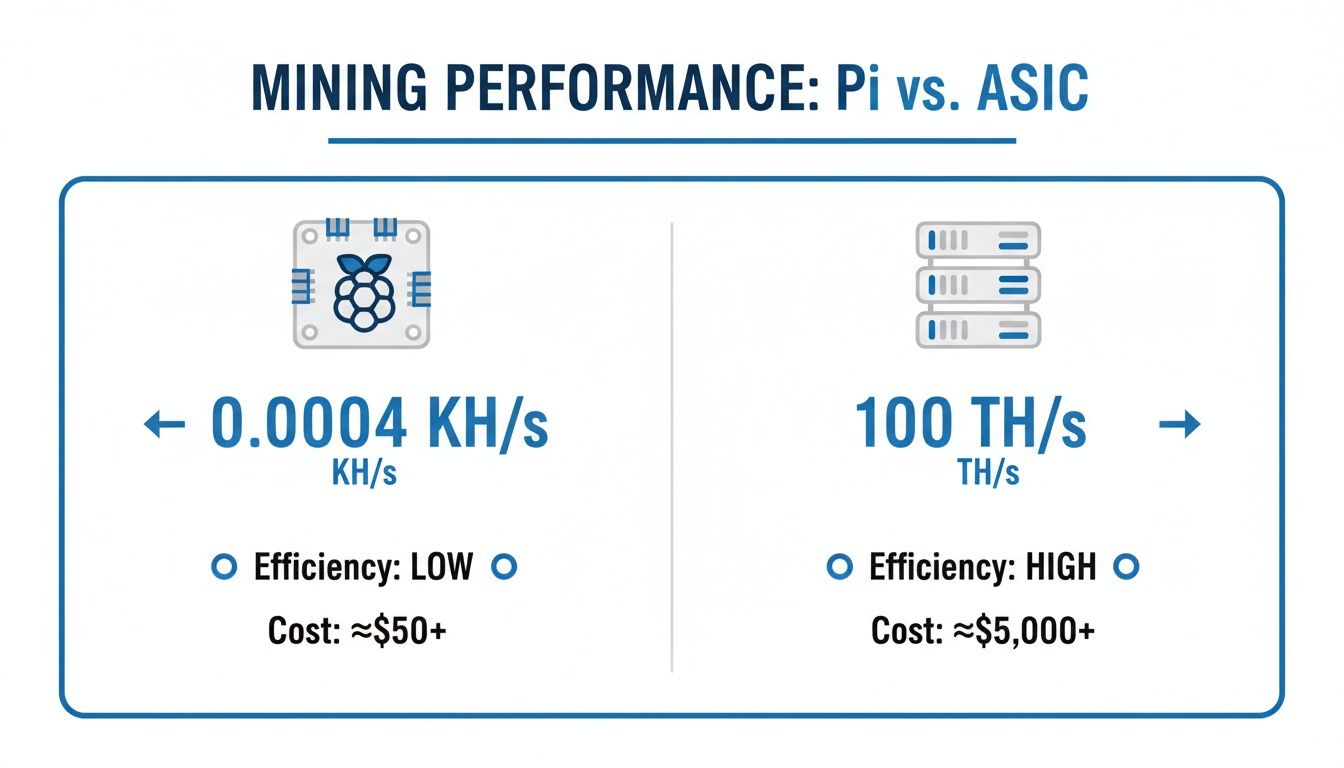
The visualization makes it crystal clear that we’re comparing two entirely different classes of hardware. ASICs operate on a scale that is orders of magnitude beyond what a tiny hobbyist board can achieve.
Understanding the Hash Rate Disparity
To put this in perspective, let’s talk numbers. Mining performance is measured in hashes per second.
- A Raspberry Pi’s CPU might manage a few hundred kilohashes per second (KH/s). That sounds like a lot, but it’s not.
- A modern Bitcoin ASIC operates in the terahashes per second (TH/s) range—that’s trillions of hashes every second.
This means a top-of-the-line ASIC is anywhere from 10 to 100 billion times faster than a Pi’s processor. It’s like comparing a rowboat to a nuclear submarine. You can find some great technical analysis that breaks down this performance gap even further.
Key Takeaway: The probability of a Raspberry Pi finding a valid Bitcoin block on its own is effectively zero. It’s statistically impossible without connecting it to external ASIC hardware.
Raspberry Pi vs. ASIC Miner Performance at a Glance
A direct comparison really highlights just how vast the performance chasm is. This isn’t about which one is “better”; it’s about understanding the right tool for the job. ASICs are built for serious mining operations, while a Raspberry Pi is for educational exploration.
| Metric | Raspberry Pi 4 (CPU) | Modern ASIC Miner |
|---|---|---|
| Hash Rate | ~100-500 KH/s | 100+ TH/s |
| Power Consumption | ~5-15 Watts | 2,500-3,500 Watts |
| Primary Use Case | Education, Hobby Projects | Commercial Profit |
| Initial Cost | ~$50 – $100 | ~$2,000 – $10,000+ |
In summary, approaching this project as an investment is a guaranteed path to disappointment. However, if you reframe the goal as gaining invaluable, hands-on experience with blockchain technology for next to nothing, it becomes one of the most rewarding tech projects you can tackle.
The True Cost of Mining on a Raspberry Pi
Once you get past the initial hardware setup, every mining rig—from a massive farm to a tiny Raspberry Pi—boils down to one crucial factor: the price of electricity. A Pi is famously low-power for everyday computing, but running its CPU at 100% around the clock completely changes the power dynamics. This is where a quick cost-benefit analysis becomes non-negotiable.
Frankly, any micro-earnings you might generate will be swallowed whole by your power bill. More often than not, you’ll end up losing money. This fact reframes the entire project. You aren’t investing in a money-making machine; you’re investing in your own education and getting hands-on experience with mining tech.
Breaking Down the Power Consumption
Let’s look at the numbers. A Raspberry Pi 4, with its processor pegged at maximum load, will consistently pull between 5 to 7 watts of power. That sounds like nothing next to an ASIC miner that chugs down thousands of watts, but it’s a constant drain that accumulates.
Here’s a simple breakdown of what that looks like:
- Daily Consumption: A Pi at a steady 6 watts uses 0.144 kilowatt-hours (kWh) per day.
- Monthly Consumption: Let that run for 30 days, and you’re looking at about 4.32 kWh.
- Annual Cost: With the average U.S. electricity rate hovering around $0.17 per kWh, that tiny device will add $8.81 per year to your bill.
And that’s just for the Pi itself. This calculation doesn’t even account for cooling fans or any connected peripherals, which will nudge the power draw even higher.
The bottom line is simple: Even with its famously low power consumption, a Raspberry Pi still costs more to run than it can ever earn from mining. The math just doesn’t add up.
The Financial Reality of Pi Mining
The raw data hammers this point home. Even when mining CPU-friendly altcoins, a Raspberry Pi 5 might generate something in the ballpark of $0.02 per day—and that’s before accounting for electricity. At a modest electricity rate of just $0.10 per kWh, your daily profit instantly dips into the negative. This is precisely why bitcoin mining on a Raspberry Pi is almost always framed as a learning exercise, not a side hustle.
To put it in black and white, here’s a table that lays out the financial reality of running a Pi miner 24/7.
Estimated Daily Profitability Breakdown
This table illustrates the financial reality of CPU mining on a Raspberry Pi, comparing potential micro-earnings against typical electricity expenses.
| Parameter | Estimated Value | Notes |
|---|---|---|
| Daily Revenue (Pre-Electricity) | ~$0.02 | Highly variable, dependent on coin and network difficulty. |
| Daily Power Cost (@ $0.17/kWh) | ~$0.024 | Based on a Pi 4/5 running at a constant 6W load. |
| Estimated Net Daily Profit | ~ -$0.004 | This small loss accumulates over time, guaranteeing no return. |
The numbers make it painfully clear that financial gain is off the table.
If you want to see how these factors play out with more powerful hardware, you can plug different scenarios into a crypto mining profitability calculator to model hashrates, power costs, and coin prices. For the Raspberry Pi, however, the conclusion is always the same: your real ROI is the knowledge you gain about blockchain, mining pools, and network operations.
Getting Your Raspberry Pi Ready to Mine
Okay, with our expectations set—learning, not earning—it’s time to roll up our sleeves and prep the Raspberry Pi. This setup is the bedrock for whatever you decide to do, whether that’s managing a powerful ASIC or just dipping your toes into altcoin mining. Getting this right from the start means your device will run efficiently and, just as importantly, securely.
First things first, let’s talk hardware. You can technically use almost any Raspberry Pi for these experiments, but to avoid a frustratingly slow experience, a Raspberry Pi 4 or a newer model is strongly recommended. The extra processing muscle, RAM, and better networking on these boards really do make a difference, preventing bottlenecks when you’re running mining software or managing network traffic.
Installing the Operating System
A Pi is just a tiny circuit board until it has an operating system. The best choice here is the official Raspberry Pi OS (what we used to call Raspbian). It’s built specifically for the hardware, so you know it’s optimized right out of the box. You’ll be installing this onto a microSD card, which serves as the Pi’s main drive.
Here’s the step-by-step process:
- Get a Good MicroSD Card: Don’t skimp on the microSD card. A fast, reliable card with at least 16 GB of space will save you a lot of headaches.
- Download Raspberry Pi Imager: This official tool handles everything for you.
- Flash the OS: Use the imager to install Raspberry Pi OS onto the card. The interface is very straightforward and lets you pre-configure settings like your username, password, and Wi-Fi details before you even boot the Pi for the first time. It’s a real time-saver.
First Boot: Configuration and Security
With the OS on the card, pop it into your Pi and power it on. There are a couple of housekeeping tasks you absolutely must do right away for both performance and security.
- Connect to Your Network: Get it connected to your network, either with Wi-Fi or an Ethernet cable.
- Run System Updates: Immediately run a full system update to ensure all software packages are up-to-date with the latest features and security patches.
- Enable SSH (Secure Shell): Enabling it means you can log in and control your Pi from your main computer over the network. Since your Pi will likely be running headless (without a monitor) 24/7, this is less of a convenience and more of a necessity.
Crucial Security Tip: Before you do anything else, change the default password. Seriously. Leaving the default “raspberry” password is like leaving your front door wide open, especially for a device connected to the internet and interacting with a crypto network.
At this point, you have a fully prepped, secure base camp. Your Raspberry Pi is ready for its crypto adventure. While we’ve covered the Pi-specific setup here, you might also find our broader guide on how to start crypto mining useful for understanding the wider ecosystem you’re about to join.
How to Use Your Pi as an Efficient ASIC Controller
Forget trying to mine Bitcoin directly on a Raspberry Pi. The real, practical value of a Pi in a mining setup is to act as the brain, not the brawn. The smartest way to incorporate bitcoin mining on a Raspberry Pi is to use it as a low-power, highly efficient controller for dedicated hardware, specifically Application-Specific Integrated Circuit (ASIC) miners.
This is where the Pi truly shines. You offload the insane number of calculations required for Bitcoin mining to the ASIC, which is built for that one job. Meanwhile, the Raspberry Pi sips just a few watts of power to handle everything else: running the mining software, managing network connections, and communicating with your mining pool. It’s a surprisingly lean and effective way to run a genuine mining operation.
This approach turns your Pi from a curiosity into the central nervous system of a potentially profitable mining rig.
Installing and Configuring Mining Software
To get your Pi and ASIC talking to each other, you’ll need the right software. For years, the go-to tool for this has been CGMiner. It’s a powerful, command-line program that gives you direct, granular control over your mining hardware. Since it’s not usually available as a simple package, you’ll have to compile it from its source code on your Pi.
Getting it running usually involves a few key stages:
- Install Dependencies: First, you’ll need to update your system and install the various libraries and tools that CGMiner needs to build and run properly.
- Download CGMiner: Next, you’ll clone the official CGMiner repository from GitHub straight to your Raspberry Pi.
- Compile the Software: This is where the magic happens. You’ll run a series of commands in the terminal to build the CGMiner executable from scratch, creating a version tailored for your Pi’s ARM processor.
Once CGMiner is installed, the real work begins with configuration. You’ll be launching the program with specific command-line arguments, or “flags,” that dictate its behavior.
Key Takeaway: The single most important part of this setup is pointing CGMiner to your chosen mining pool. This means providing the pool’s Stratum address, your username (or wallet address), and a worker password. This allows your ASIC, managed by the Pi, to contribute its hash power and start earning rewards.
Connecting to Your ASIC and Mining Pool
With the software side handled, it’s time to connect the hardware. Just plug your USB ASIC miner into one of the Pi’s available USB ports. Raspberry Pi OS should recognize it automatically.
Now, you just need to run a single command in the terminal to fire everything up. A typical startup command will need to specify a few things:
- The mining pool’s server URL (e.g.,
stratum+tcp://pool.viabtc.com:3333). - Your worker name and password.
- The type of ASIC device you’ve connected.
This launch command is what tells CGMiner where to send the hashing results and how to credit your account. Once it’s running correctly, the software will instantly start feeding jobs to the ASIC. You can watch its performance, hash rate, and temperature in real-time, right from the Pi’s command line.
You’ve now built a powerful, low-cost control hub for your mining operation, all while keeping your energy consumption and physical footprint incredibly small.
Exploring Altcoin Mining as a Learning Exercise
We’ve established that using a Pi as an ASIC controller is a practical, smart move. But what if you’re itching to see the Pi’s own hardware actually mine something? Bitcoin is off the table, but this is where the world of altcoins provides a perfect opportunity for a hands-on learning experience.
The real goal here isn’t about making money—it’s about getting your hands dirty and understanding the entire crypto mining process from the ground up. You’ll learn how to configure mining software, connect to pools, and manage wallets, all without dropping a dime on expensive, specialized rigs.
Think of your Pi as a low-stakes sandbox. It’s the perfect tool for exploring how mining software talks to a live blockchain network without any real financial risk.
Choosing a CPU-Friendly Coin and Software
The trick is to find an altcoin with a hashing algorithm built to resist ASICs. This levels the playing field just enough to make CPU mining a worthwhile, if unprofitable, experiment. The classic choice for this is Monero (XMR), which runs on the RandomX algorithm, making it one of the go-to coins for anyone wanting to dabble in CPU mining.
To get started, you’ll need the right software. XMRig is a fantastic open-source Monero miner that’s known for its performance. Best of all, it’s widely supported and can be compiled to run directly on your Raspberry Pi’s ARM processor. You’ll begin by grabbing the source code and compiling it right on your device. It involves a few command-line steps, but it’s an incredible lesson in how software is actually built and tailored for specific hardware.
Compiling and Configuring Your Miner
With XMRig compiled, it’s time to configure it. This is usually handled by editing a simple text file where you’ll plug in the critical details.
- Your Wallet Address: This is the destination for any mining rewards you might earn.
- The Mining Pool URL: You’ll need to point your miner to a pool to contribute effectively.
- CPU Settings: You can often fine-tune settings here to get a bit more performance out of your Pi’s processor.
This configuration step is really the heart of the lesson. It’s the moment you connect your little machine to a global network and start participating, in a small way, in securing a blockchain. Figuring out how these pieces connect is a core skill in the crypto world.
The real value of this project is mastering the configuration. Learning to correctly point your miner to a pool, manage wallet addresses, and fix connection problems are skills that transfer directly to any large-scale mining operation.
Joining an Altcoin Mining Pool
Let’s be realistic: your Raspberry Pi won’t find a block on its own. That’s why joining a mining pool is absolutely essential. A pool lets you combine your Pi’s modest hashing power with thousands of other miners, which dramatically increases the chances of earning a reward and getting a small piece of the pie.
Picking a pool means looking at things like fees, how they pay out, and where their servers are located. For a deep dive, check out our guide that explains how to join a mining pool. Once you find one you like, you’ll drop its address into your XMRig config file, fire up the miner, and watch your Pi start pulling down jobs and submitting shares.
FAQ: Common Questions About Raspberry Pi Mining
Dipping your toes into bitcoin mining on a Raspberry Pi can be confusing. There’s a lot of technical jargon floating around, and it’s easy to get bogged down by myths and misinformation. Let’s cut through the noise and tackle some of the most common questions head-on.
1. Can you actually make money mining crypto on a Pi?
Let’s be blunt: no. The idea of a tiny computer generating a profit is appealing, but it’s just not realistic. Even if you pick the most CPU-friendly altcoin out there, a Raspberry Pi’s processor simply doesn’t have the muscle to earn enough to cover its own electricity bill.
To put it in perspective, tests with a Raspberry Pi 5 on CPU-friendly coins showed it might generate around $0.02 per day—and that’s before you even think about power costs. Once you factor in electricity, you’re looking at a net financial loss every single day. The real payoff here is the hands-on experience with blockchain tech, not cash.
2. Which Raspberry Pi is best for mining?
For any task related to mining—whether you’re just playing around with altcoins or using the Pi as a controller for an ASIC miner—you’ll want a Raspberry Pi 4 or newer. The performance jump from older models is massive and makes a real difference.
Here’s why a more recent model is a smart choice:
- A Better CPU: A stronger processor makes everything smoother, especially when you’re compiling software from source code like CGMiner or XMRig.
- More RAM: The 4GB or 8GB models are perfect for avoiding slowdowns.
- Faster Networking: The Gigabit Ethernet port gives you a rock-solid connection to your mining pool, which is crucial for preventing rejected “stale” shares.
You could technically use an older Pi, but be prepared for a sluggish and often frustrating experience. A Pi 4 or 5 makes the whole learning process far more enjoyable.
3. Can mining damage a Raspberry Pi?
Yes, it absolutely can. Mining software will push your Pi’s CPU to 100% load and keep it there continuously. This generates a serious amount of heat. Without good cooling, the processor will hit its temperature limit and thermally throttle, meaning it automatically slows down to avoid damage.
While throttling is a great safety feature, constantly running at high temperatures can definitely shorten the lifespan of your Pi’s components over time. Think of it like redlining a car engine 24/7—it’s just not a good long-term strategy.
4. What is the most profitable coin to mine on Raspberry Pi?
There is no “profitable” coin to mine directly on a Raspberry Pi’s CPU. The electricity cost will always exceed the mining revenue. However, for learning purposes, CPU-friendly coins like Monero (XMR) are the best choice. Their algorithms are designed to be more accessible to general-purpose processors, allowing you to experience the full mining process without needing specialized hardware.
5. What essential accessories do I need?
To prevent your Pi from overheating and crashing, you need to treat thermal management and stable power as requirements, not options.
| Component | Recommendation | Why You Need It |
|---|---|---|
| Cooling | Active Cooler or Large Heatsink | An active cooler with a fan is your best bet. It will keep temperatures in check under a constant mining load and prevent throttling. |
| Power Supply | Official Raspberry Pi Power Adapter | The official adapter delivers clean, stable voltage, which stops annoying under-voltage warnings and random reboots. Don’t cheap out. |
| MicroSD Card | High-Endurance Class A2 Card | Mining creates a lot of log files, which means constant read/write activity. A high-endurance card is built for this and is far less likely to fail. |
Spending a little extra on these key accessories is the smartest move you can make. It keeps your Pi stable and saves you from the headache of troubleshooting random crashes.