Build Your GPU Mining Rig
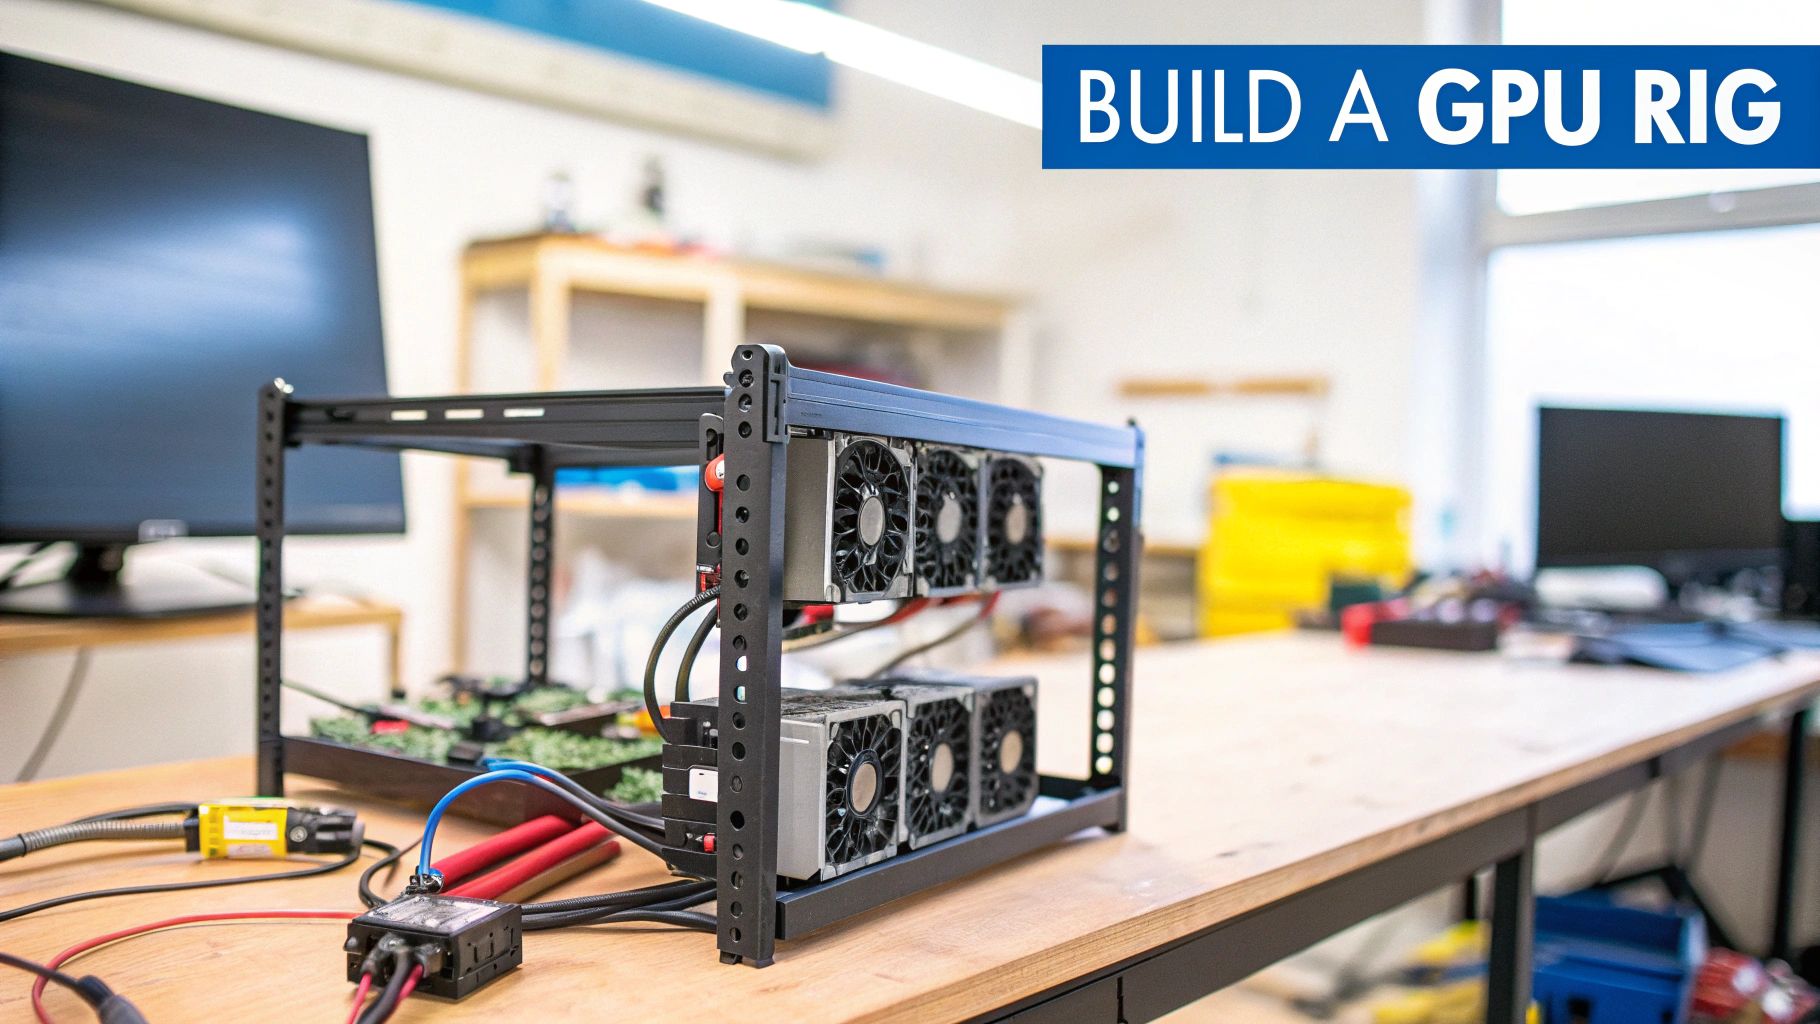
A GPU mining rig is essentially a purpose-built computer, but instead of focusing on general tasks, its entire design is geared towards one thing: cryptocurrency mining. It does this by packing in multiple high-performance graphics cards, all working together to solve complex cryptographic puzzles and earn you altcoins.
Why Build A GPU Mining Rig Today
Let’s be direct. The crypto market has changed, but building a GPU mining rig is still a compelling project for anyone interested in decentralized networks. It’s a hands-on way to support various blockchains and earn altcoins in the process.
The single biggest argument for a GPU rig over a specialized ASIC miner is flexibility. An ASIC is a one-trick pony; it’s designed to mine one specific algorithm, and that’s it. When that coin or algorithm falls out of favor, the ASIC is little more than an expensive paperweight.
A GPU rig, on the other hand, can adapt. You’re building a versatile machine that can mine a huge range of different cryptocurrencies. In a market where profitability can shift overnight, that adaptability is your most valuable asset. If one coin’s prospects dim, you just point your rig at the next promising target.
The Ethereum Boom And Its Legacy
GPU mining really hit the mainstream during the big Ethereum boom. Throughout the mid-2010s, miners discovered that standard gaming GPUs could be absolute powerhouses for mining ETH. When Ethereum’s price shot up from about $8 in early 2017 to over $1,400 a year later, it kicked off a gold rush, causing massive GPU shortages worldwide. A single rig could generate serious income, and that period proved just how powerful adaptable hardware could be.
Key Takeaway: Even after Ethereum moved away from mining in 2022, the core lesson holds true. A GPU rig is an asset that can pivot. The hardware keeps its value not just for mining other coins but also for gaming, AI projects, or 3D rendering, meaning it never truly becomes obsolete.
Finding Your Niche In Today’s Market
The name of the game today is efficiency and smart coin selection. You won’t be mining Bitcoin with a GPU, but there are countless other promising altcoins that rely on GPU-based security. Success is now a balancing act between hashrate (raw mining power) and electricity consumption to get the best possible return on your investment.
This guide is your complete roadmap, offering a realistic look at the entire process from start to finish. We’ll cover all the essentials:
- Smart Component Selection: How to pick the right GPUs, motherboard, and power supply for maximum efficiency.
- Building Your Rig: A practical, step-by-step guide to assembling your hardware.
- Software and Configuration: Getting the best OS and mining software installed for your specific setup.
- Performance Tuning: How to tweak your rig for peak performance and profitability.
Before you buy a single component, you need a clear picture of potential earnings. A great first step is to check out our guide on using a crypto mining profitability calculator to run the numbers based on your hardware choices and local electricity costs. This is as much a technical journey as it is a financial one.
Choosing the Right Hardware for Your GPU Mining Rig
Building a profitable GPU mining rig is all about a smart, calculated balance. It’s not about just grabbing the most powerful graphics card off the shelf; it’s about piecing together a purpose-built machine designed to run 24/7, maximizing hashrate while keeping electricity costs firmly in check.
Every single component, from the star-of-the-show GPU down to the humble PCIe riser, is critical for the stability and long-term success of your operation. Getting these choices right from the start will save you from endless troubleshooting headaches and costly missteps later on. Let’s walk through the essential hardware, piece by piece.
Selecting Your Graphics Cards
The GPUs are the heart of your rig. They do all the heavy lifting, and the old NVIDIA vs. AMD debate is as alive as ever in the mining world. The best choice really boils down to the specific algorithms you plan to mine.
Forget raw hashrate for a moment. The single most important metric for a miner is hash-per-watt. This simple figure tells you how efficient a card is—how much hashing power you squeeze out for every watt of electricity you pay for. A card with a slightly lower hashrate but drastically lower power consumption will almost always be the more profitable choice over the long haul.
Beyond pure efficiency, here’s what to keep in mind:
- VRAM is Key: Some algorithms are incredibly memory-hungry. Today, a card with 6GB of VRAM is the absolute minimum, but I’d strongly recommend aiming for 8GB or more to give yourself some breathing room for the future.
- Resale Value Matters: The crypto market shifts. GPUs that are also popular with gamers tend to hold their value far better, giving you a solid exit strategy if you decide to sell your hardware.
- Cooling Design: Prioritize cards with robust, multi-fan cooling systems. While blower-style cards can work, they generally run hotter and much louder, especially when you have several of them packed together in an open-air rig.
Here’s a look at how some popular cards stack up in the real world. This table offers a snapshot of what you can expect from some common GPUs. Remember, these are average figures; your results will vary based on your specific overclocks, the miner software, and even the ambient temperature of your room.
| GPU Model | Algorithm (Example) | Average Hashrate | Power Draw (Watts) | Price/Performance Score |
|---|---|---|---|---|
| NVIDIA RTX 4090 | ETHASH B3 | 140 MH/s | 280-320W | Good |
| NVIDIA RTX 3070 | KawPoW | 28 MH/s | 120-140W | Excellent |
| AMD Radeon RX 6800 | ETCHASH | 62 MH/s | 110-130W | Excellent |
| AMD Radeon RX 7900XT | ETHASH B3 | 90 MH/s | 220-250W | Fair |
To sum up: The “Excellent” cards in the table represent the sweet spot for miners. They offer a fantastic balance of purchase price, hashing power, and power efficiency, making them a smart long-term investment.
Building Out the Supporting Infrastructure
While GPUs get all the attention, the components holding everything together are just as vital for a stable system. Skimping on the motherboard or power supply is a classic rookie mistake that always leads to frustration and can even cause permanent hardware damage.
Expert Insight: The cryptocurrency mining hardware market is projected to grow substantially, with the GPU segment alone expanding at a 10.3% CAGR. This growth underscores the importance of choosing efficient hardware, as profitability can be tight. For example, a high-end rig might take over five years to recoup its initial investment, making every watt saved a direct boost to your bottom line. Discover more insights on the mining hardware market from Technavio.
Your motherboard is the central nervous system. You don’t need flashy gaming features, but you absolutely must have enough PCIe slots to handle all your GPUs. Specialized mining motherboards are built for this, but certain gaming boards with 4-6 slots can also do the job just fine.
The rest of the core parts can be very basic:
- CPU (Processor): An inexpensive, entry-level chip like an Intel Celeron or AMD Athlon is all you need. Its only job is to get the operating system running; it plays no part in the actual mining.
- RAM (Memory): For most mining operating systems, 4GB to 8GB of RAM is plenty.
- Storage: A small 120-250GB SSD is the perfect choice for fast boot times and reliability. Don’t bother with a traditional hard drive.
Powering Your Rig Safely and Efficiently
The Power Supply Unit (PSU) is, without question, the most critical component for both safety and stability. A cheap or underpowered PSU is not only a primary cause of system crashes—it’s a legitimate fire hazard.
Here’s a simple process for choosing the right PSU:
- Calculate Total Power Draw: Add up the maximum power draw (often called TDP) of all your GPUs.
- Add System Power: Tack on another 100-150 watts for the rest of the system (motherboard, CPU, etc.).
- Apply the 20% Rule: Take your total and choose a PSU that gives you at least 20% headroom. For example, if your rig pulls 800W, a 1000W PSU is a smart and safe bet.
Always, always buy a PSU with an 80+ Gold rating or better. This certification is a guarantee of efficiency, meaning less of your precious electricity is wasted as heat. This saves you money on your power bill and helps your components live longer. A modular PSU is also a great quality-of-life investment, as it lets you use only the cables you need, which massively improves airflow and makes building the rig much cleaner.
The Frame and Connectors That Bring It All Together
Finally, you need a skeleton for your rig. The standard is an open-air mining frame. These purpose-built frames provide far better airflow than a closed PC case, which is absolutely essential for keeping multiple GPUs cool while they’re running at 100% load around the clock.
You’ll also need a set of PCIe risers. These are small adapters that let you connect the GPUs to the motherboard’s slots from a distance, rather than plugging them in directly. This spacing is non-negotiable for proper heat dissipation. When you’re buying them, make sure to get quality risers that use a 6-pin power connector, which is the most stable and safe option.
If you’re still piecing together how all these parts fit into the larger process, this guide on how to start crypto mining offers a great high-level overview.
Assembling Your GPU Mining Rig
You’ve got a pile of expensive hardware in front of you. Now for the fun part: turning that collection of boxes into a money-making machine. Putting a rig together is more about being patient and methodical than having a deep engineering background. A little care here saves you a world of headaches later, trust me.
We’ll build this from the ground up. First, we’ll get the motherboard, CPU, and RAM all working together, and then we’ll move on to installing the GPUs and wrangling the jungle of power cables.
The whole selection process you just went through—choosing the right cards, a beefy enough power supply, and a solid frame—all leads to this moment.
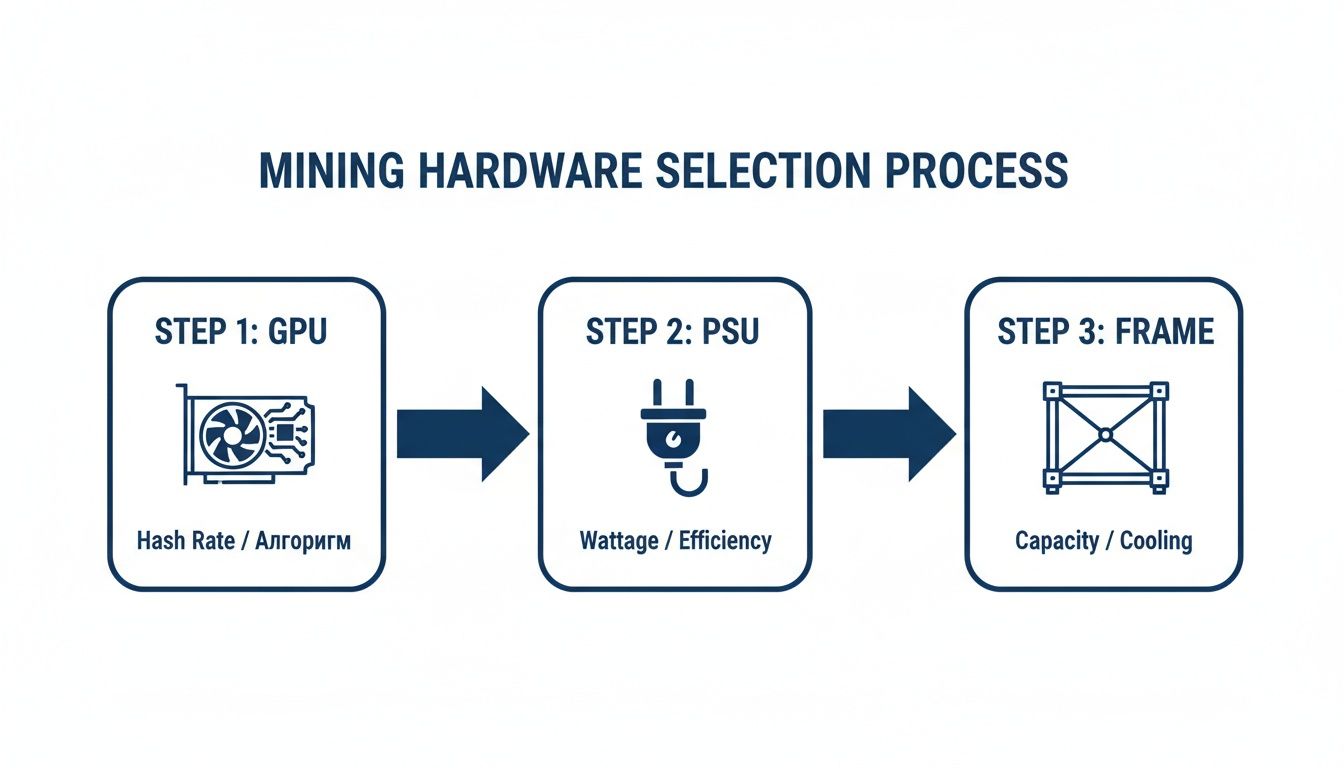
This is the hierarchy of your build: the GPUs are the heart, the PSU is the muscle, and the frame is the skeleton holding it all together.
Building the Core System
Before you even think about putting the motherboard in the frame, do yourself a favor and build the core system on your workbench. The motherboard box is perfect for this—it’s non-conductive and gives you plenty of elbow room.
- Installing the CPU: Pop open the retention arm on the CPU socket. You’ll see a tiny triangle on both the CPU and the socket—line them up and gently set the processor in place. Lower the arm to lock it down. No force is needed here.
- Seating the RAM: Open the clips on the RAM slots on either side. Line up the notch on the RAM stick with the one in the slot and press down firmly on both ends. You’ll hear a satisfying click as the clips snap shut.
- Mounting the Motherboard: With the basics installed, it’s time to secure the motherboard to the mining frame using the included screws and standoffs. Get it snug, but don’t crank down on the screws like you’re changing a tire.
That’s it. The brain of your operation is now assembled. Next up, we connect the graphics cards that will do all the heavy lifting.
Installing GPUs and PCIe Risers
This is where a lot of first-time builders get tripped up. A rig that won’t boot is often just a case of a poorly seated riser or GPU. We use PCIe risers to connect each GPU to the motherboard via a USB cable. It seems weird, but this is what lets you space the cards out on the frame for proper cooling instead of cramming them all onto the board.
Here’s the drill:
- Assemble the Risers: Each riser kit has two parts: a tiny board for the motherboard’s PCIe x1 slot and a larger one for the GPU. Connect them with the USB 3.0 cable they came with.
- Seat the GPUs: Plug each graphics card into the x16 slot on its riser board. Make sure it’s fully seated; you should feel it lock into place.
- Mount the GPUs: Now, screw each GPU onto the top bar of your mining frame. Leave at least a couple of inches between cards for airflow. Don’t crowd them.
My Go-To Tip for a Sanity Check: Don’t plug in all your GPUs at once. Start with just one. Connect it via its riser to the main PCIe x16 slot and see if the system boots. If it works, you know the core system is good. If it doesn’t, you only have one card and one riser to troubleshoot instead of six or eight. It makes finding a problem infinitely easier.
Mapping Out Power Connections
Getting your power distribution right isn’t just about stability; it’s a massive safety issue. You can’t just plug things in wherever they fit. Overloading a single cable is how you fry expensive components or, worse, start a fire.
Here’s the most important rule: never power more than two GPUs (or one GPU and its riser) from a single string of PCIe power cables.
Your power supply unit (PSU) came with a bunch of different cables. Here’s what they’re for:
| Cable Type | Where It Goes | Its Job |
|---|---|---|
| 24-Pin ATX | Motherboard | Gives the motherboard its main power. |
| 8-Pin (4+4) CPU | Motherboard (near the CPU) | Powers your processor. |
| 8-Pin (6+2) PCIe | Graphics Cards & Risers | The high-wattage connection for your GPUs. |
| SATA / Molex | SSD, Case Fans | Powers your storage and other small parts. |
Think about balancing the load. If you’re running two PSUs, split the GPUs evenly between them. Always use dedicated PCIe cables for each GPU. And whatever you do, do not use those flimsy SATA-to-PCIe power adapters to power a GPU or a riser. They are a notorious fire hazard because they aren’t designed for the high, constant power draw of mining.
Take a few minutes to manage your cables with zip ties. It’s not just for looks—clean cabling dramatically improves airflow and makes it so much easier to work on the rig later.
In summary: The assembly phase is about methodical work. Test the core components first, install GPUs one by one for easy troubleshooting, and prioritize safe power distribution above all else. A clean, well-cabled rig isn’t just for show; it’s a more reliable and safer rig.
Bringing Your Rig to Life: Software Setup
Your rig is built, the cables are managed, and it’s time to give it a brain. The software stack—from the operating system to the miner itself—is the crucial link between your powerful hardware and your future earnings. Getting this part right is less about raw power and more about stability, efficiency, and making your life easier.
The first major fork in the road is deciding on your rig’s operating system. You can stick with what you know, like Windows, or jump into a dedicated, purpose-built mining OS. There’s a real trade-off here between familiarity and raw, specialized function.
Choosing Your Operating System
For anyone just dipping their toes into mining, firing up a fresh install of Windows 10 or 11 seems like the natural choice. It’s familiar territory, and you won’t have to learn a new environment just to get started. But for a rig that’s meant to be a serious, 24/7 workhorse, specialized Linux-based systems like HiveOS or RaveOS are almost always the better long-term play.
These platforms are lean, mean, mining machines. They’re built for one purpose, and it shows. The real killer feature is remote management. Imagine tweaking overclocks, checking temperatures, and rebooting your rig from a web browser on your phone, from anywhere in the world. That’s what a dedicated mining OS gives you out of the box.
Let’s look at how they really stack up in practice.
Comparing Mining OS Options
| Feature | Windows 10/11 | HiveOS / RaveOS (Mining OS) |
|---|---|---|
| Ease of Use | High (Familiar interface) | Medium (Learning curve for new users) |
| Remote Management | Difficult (Requires third-party tools) | Excellent (Built-in, web-based control) |
| Stability | Good (But prone to random updates) | Excellent (Stripped-down, optimized for 24/7 uptime) |
| Cost | Requires a license | Free for one rig (small fee for multiple) |
| Driver Management | Manual installation and updates | Often automated and pre-packaged |
The bottom line: If this is a one-off experimental rig, Windows will get the job done just fine. But if you have any ambition of running this rig as a serious investment or maybe even building a second one, do yourself a favor and put in the time to learn a dedicated mining OS. The stability and convenience are worth every minute of the learning curve.
Installing the OS and GPU Drivers
Once you’ve picked your path, the installation is pretty standard. For a mining OS, you’ll grab a tool like balenaEtcher to “flash” the OS image onto a small SSD or a durable USB drive. This becomes your boot drive. For Windows, you’ll use Microsoft’s official Media Creation Tool to make a bootable USB stick.
With the OS up and running, your next task is absolutely non-negotiable: installing the correct GPU drivers. Without them, your GPUs are just expensive paperweights.
- For NVIDIA GPUs: Go straight to the source. Download the latest “Game Ready” or “Studio” driver from NVIDIA’s website for your exact GPU model.
- For AMD GPUs: Head over to AMD’s support page and get the newest Adrenalin Edition software package for your card.
If you see an option for a “clean installation,” always check it. This process wipes any old, conflicting driver files and can save you from hours of troubleshooting mysterious crashes down the line.
Pro Tip: The very first thing you should do on a Windows mining rig is find and disable automatic updates. Nothing is more infuriating than a forced Windows update rebooting your machine in the middle of the night, killing your hashrate and your profits. You need to be in total control.
Selecting and Configuring Your Miner Software
Now for the final piece of the puzzle: the miner software. This is the program that actually does the heavy lifting. It connects to a mining pool, gets the work, and tells your GPUs what to do. The best miner often comes down to your specific GPUs.
A few of the most reliable and well-regarded miners in the community are:
- T-Rex Miner: A beast for NVIDIA cards, famous for squeezing out great performance with low dev fees.
- TeamRedMiner: The go-to choice for most AMD users, with fantastic optimizations for their newer architectures.
- Gminer: A solid all-rounder that works great with both NVIDIA and AMD cards on a ton of different algorithms.
You’ll configure this software in one of two ways. On Windows, this is usually done by editing a simple batch file (a text file with a .bat extension). On a mining OS like HiveOS, you’ll use their web interface to build what’s called a “Flight Sheet.”
Either way, you need to provide the same three critical details:
- The Algorithm: The specific hashing algorithm for the coin you’re mining (e.g.,
etchash,kawpow). - The Mining Pool Server: The unique address and port number your chosen pool gives you (e.g.,
stratum+tcp://us1-etc.ethermine.org:4444). - Your Wallet Address: This is your personal crypto wallet address for that specific coin. Double and triple-check this—it’s where your money goes!
Picking a good mining pool is just as important as picking good hardware. Things like the pool’s fee, payout method (PPLNS, FPPS), and your connection latency (ping time) can all eat into your daily profits. To get a handle on this, you can learn more about how to join a mining pool and what to look for to ensure you’re making the right choice.
Once that’s all set, you’re ready to launch the miner and watch the hashes start rolling in.
Optimizing Your Rig for Peak Performance

Getting your rig to hash away is a great feeling, but that’s just the first step. The real art of profitable mining lies in optimization—squeezing every last drop of hashrate out of your hardware while using the least amount of electricity. This is where you transform a working rig into a truly efficient, money-making machine.
The goal isn’t to just crank every dial to the max. That’s a rookie mistake and a surefire way to cause crashes, generate a ton of heat, and drastically shorten the lifespan of your expensive GPUs. What we’re really chasing is the “efficiency sweet spot,” that perfect balance where hashrate and power consumption deliver the highest possible return. This process is a delicate dance between overclocking, undervolting, and smart cooling.
The Core Principles of GPU Tuning
At the heart of optimization are two key adjustments: overclocking and undervolting. They might sound intimidating, but the concepts are pretty straightforward.
- Overclocking: This means you’re running your GPU’s memory or core faster than its default factory settings. For almost all mining algorithms, the memory clock speed is far more critical to your hashrate than the core clock.
- Undervolting: This is simply reducing the voltage supplied to the GPU core. Less voltage means less power drawn from the wall and, just as importantly, less heat being produced.
The magic really happens when you combine them. By slightly lowering the core clock, undervolting it as much as possible, and pushing the memory clock higher, you can often achieve a better hashrate while using significantly less power than the card’s stock profile. Your command center for these tweaks will be a tool like MSI Afterburner on Windows or the built-in dashboards in dedicated mining operating systems like HiveOS.
Key Insight: Finding the perfect settings is a patient, iterative process. Make one small adjustment, let the rig run for 15-20 minutes to check for stability, and then repeat. Pushing too far, too fast, will only lead to crashes and “invalid shares,” which directly hurt your earnings.
Practical Overclocking and Cooling Strategies
Heat is the absolute number one enemy of a stable mining rig. When a GPU gets too hot, it automatically “thermal throttles,” which means it slows itself down to avoid damage. This makes your optimization and cooling strategies two sides of the same coin.
A fundamental first step is to set a custom fan curve. Don’t let the GPU’s default settings decide when to cool things down. You need to take control. An aggressive fan curve keeps temperatures consistently low, which prevents throttling and helps your hardware last longer. For instance, you could set the fans to jump to 75% speed the moment the GPU core hits 55°C.
Beyond the fans on the cards themselves, the ambient temperature in your room is just as vital.
- Make sure there’s good airflow around the entire rig. Don’t shove it in a closet.
- Use box fans or industrial fans to create a constant flow of cool air into the rig and to push hot air away from it.
- In warmer climates, a dedicated air conditioner might be a necessary operational cost.
Every single GPU is a little different due to something called the “silicon lottery,” so these numbers will need fine-tuning for your specific cards. But here are some common starting points to get you going.
Example Overclock Settings for Popular GPUs
This table provides a solid baseline to begin your tuning adventure. Think of these as safe starting points; from here, you can start making small, incremental adjustments to find what works best for your individual cards.
| GPU Model | Algorithm | Core Clock (MHz) | Memory Clock (MHz) | Power Limit (%) |
|---|---|---|---|---|
| NVIDIA RTX 3070 | ETCHASH | -500 | +1200 | 55% |
| NVIDIA RTX 3080 | KawPoW | +100 | +1000 | 70% |
| AMD RX 6700 XT | ETCHASH | 1150 | 2130 | Not applicable (set via voltage) |
| AMD RX 6800 | ETCHASH | 1200 | 2120 | Not applicable (set via voltage) |
Note: AMD cards often require absolute clock settings rather than offsets, and power is controlled via direct voltage settings, not a percentage-based power limit.
Advanced Tuning and Rig Monitoring
Once you’ve found stable settings, you can delve into more advanced territory like BIOS modding. This involves flashing custom firmware to your GPU to tweak things like memory timings. While it can unlock some serious performance gains, especially on certain AMD cards, this is an expert-level technique. It carries a real risk of permanently damaging (“bricking”) your hardware and will absolutely void your warranty.
With your rig finally dialed in, ongoing monitoring is what separates a hobby from a professional operation. You can’t just set it and forget it. Your mining software and OS are constantly feeding you data that you need to keep an eye on.
Key metrics to watch like a hawk include:
- Individual GPU Hashrates: A sudden dip from a single card is often the first sign of a problem.
- GPU Temperatures and Fan Speeds: Monitor core and memory junction temps to head off overheating.
- Accepted vs. Rejected Shares: A high number of rejected or invalid shares is a clear signal your overclock is unstable.
Most mining platforms let you set up alerts, and you should use them. Configure a notification to your phone if a GPU’s temperature spikes or if the whole rig goes offline. This kind of proactive monitoring means you can fix problems fast, minimizing downtime and keeping your rig hashing at its peak.
In conclusion: Optimization is an ongoing process, not a one-time setup. By carefully balancing overclocks with power usage and actively managing heat, you can significantly boost your rig’s profitability. Start with conservative settings, make small changes, and always monitor for stability.
Frequently Asked Questions (FAQ)
Is GPU mining still profitable in 2024?
Yes, it can be, but profitability depends heavily on three factors:
- Your electricity cost: This is often the single biggest expense. Lower costs dramatically increase potential profit.
- Hardware efficiency: You need to choose GPUs that provide a high hashrate for every watt of power they consume (hash/watt).
- The crypto market: The value of the coins you mine directly impacts your earnings.
Before starting, always use a real-time profitability calculator to estimate potential earnings based on your specific hardware and electricity rate.
What is the best GPU for a mining rig?
There’s no single “best” GPU, as the ideal choice depends on your budget and what you plan to mine. However, the best value is usually found in cards that offer an excellent balance of purchase price, hashing power, and energy efficiency. Models like the NVIDIA RTX 3070 or the AMD Radeon RX 6800 are popular because they hit this sweet spot. The key is to look for the highest hash-per-watt performance you can afford.
How many GPUs can you put in one mining rig?
The physical limit is determined by the number of PCIe slots on your motherboard.
- Standard Motherboards: Most consumer-grade motherboards support 4 to 6 GPUs. This is a great starting point for a stable and manageable rig.
- Mining-Specific Motherboards: These are designed to handle many more cards, often supporting 8, 12, or even 19 GPUs on a single board.
Remember, you also need a powerful enough Power Supply Unit (PSU) and adequate cooling to support the number of cards you plan to run.
Can I use a GPU mining rig for gaming?
Absolutely! At its core, a GPU mining rig is just a powerful computer. You can easily use one of the GPUs in the rig for gaming, video editing, or any other graphics-intensive task. Many people build a rig that mines when they are not using it and then switch over to gaming when they want to play. This versatility is one of the biggest advantages of a GPU rig over a specialized ASIC miner.
What’s the difference between a GPU rig and an ASIC miner?
Think of it as a multi-tool versus a specialized instrument.
| Miner Type | Primary Advantage | Main Disadvantage |
|---|---|---|
| GPU Mining Rig | Flexibility: Can mine hundreds of different coins. | Less Efficient: Not as powerful as ASICs on major algorithms. |
| ASIC Miner | Peak Efficiency: Unbeatable power for one specific algorithm. | Inflexible: Can only mine a single algorithm, making it obsolete if that coin fails. |
A GPU rig gives you the freedom to adapt to changes in the crypto market, while an ASIC bets everything on the long-term success of a single cryptocurrency like Bitcoin.